


Yates Success Ultra Insect Control - Concentrate
Helps control common caterpillars, thrips, codling moth and tomato potato psyllid. Contains spinetoram derived from beneficial soil bacteria.
Create a Yates account today!
Sign up to join the Yates Garden Club for monthly e-mails packed with seasonal inspiration, tips for success & exclusive promotions.
Plus if you’re a Garden Club member you can take part in the Yates Growing Community - a blog to share successes, get advice & win prizes in fun challenges along the way!
Enter the email address associated with your account, and we'll email you a new password.
If you’ve ever admired the beautiful, fragrant garlic you see at Farmer's Markets, you’ll be pleased to know that growing your own garlic at home is very straightforward.
Garlic is such a delicious ingredient to cook with; if you like the sound of fresh, home-grown cloves, autumn is the best time to get garlic bulbs into the ground.

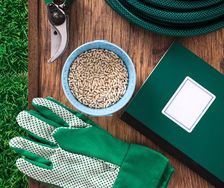
Step 1: Find a sunny spot in a garden bed that you can dedicate to growing garlic, for about 8 months. Garlic does take a while to mature, but it's worth the wait! Ideally the soil should be well drained and on the slightly acidic side (pH of around 6). Raised garden beds are ideal for growing garlic. If you have alkaline soil (pH above 7), then applying some Yates Soil Acidifier Liquid Sulfur can help reduce the soil pH. You can also grow garlic in a pot – the bigger the pot the easier it will be to maintain (and the more garlic you can grow), so choose a pot that’s at least 30cm in diameter.
Step 2: Mix some Yates Thrive Natural Blood Bone into the garden soil or potting mix. This helps increase the amount of organic matter in the soil, which attracts earthworms and soil microbes, helps to retain moisture and nutrients in the soil and promotes better soil structure. Yates Thrive Natural Blood & Bone will also provide the garlic with slow release organic nutrients as it establishes.
Step 3: It’s best to buy fresh garlic cloves from a garden centre, as garlic purchased in a supermarket may have been sprayed with a sprouting inhibitor and may not grow.
Step 4: Plant the garlic cloves around 4cm deep with the pointy end facing up, leaving around 10cm between each clove.
Step 5: After planting, water the garden bed or pot well and apply a 5cm layer of mulch like sugar cane or pea straw. This will help keep the soil moist.
Step 6: When the first garlic shoots emerge through the mulch, start feeding every fortnight with Yates Thrive All Purpose Soluble Plant Food. It’s a complete plant food that’s high in nitrogen to promote healthy leaf growth as well as phosphorus and potassium to encourage development of good-sized garlic bulbs. Keep feeding and watering regularly.
After around 8 months, or when a few of the leaves start to die back, it’s time to harvest. Hang harvested plants (with the leaves still attached) in an airy sheltered spot for about a month to dry and cure, then it’s ready to use.

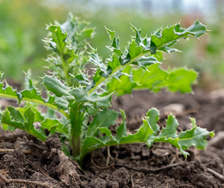
Whether you whizz it up in a green smoothie, use in a stir fry, bake it into chips, add it to a frittata or mix into pasta or rice dishes, kale is a healthy, versatile vegie.
Kale is rich in vitamins, minerals and dietary fibre, as well as sharing health benefits with other plants in the brassica family. Yates Kale 'Tuscan' is a mild flavoured variety that's ready to cut from around 7 weeks.
Kale Growing Guide:
Growing:
Kale can be sown directly where it is to grow, or sown 6mm deep in trays filled with seed raising mix. Transplant seedlings into a sunny or semi-shaded spot when around 4-6cm high.
Kale can also be grown in containers, making it ideal for courtyard and balcony gardens.
It’s important to feed leafy vegies like kale with a nitrogen (N) rich complete plant food, as nitrogen is the key nutrient that promotes green leaf growth. A ‘complete’ plant food is one that contains the 3 main elements for plant growth – nitrogen (N), phosphorus (P) and potassium (K).
Seaweed alone doesn't provide plants with all the nutrition they need for healthy growth, so relying solely on seaweed can result in poorly performing plants and a reduced harvest. It’s easy to supply kale with all the nutrients it needs by feeding each week with Yates Thrive Vegie & Herb Liquid Plant Food.
Dilute 1 – 2 capfuls in a 9L watering can and apply over the foliage and surrounding soil (or potting mix, for container grown kale).
Protecting:
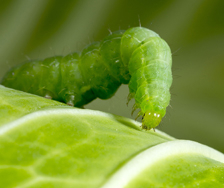
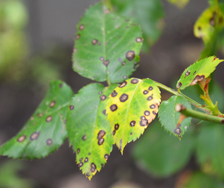
Protect young kale seedlings from snails and slugs with a light sprinkling of Yates Blitzem Snail Slug Pellets. Keep an eye out for small white butterflies which flutter around the vegie patch. They are likely to be cabbage white butterflies, which lay their yellow eggs onto the leaves of brassica vegies, like kale.
Tiny but voracious green caterpillars hatch out of these eggs, then grow to around 3cm long. These pests can decimate kale leaves. Yates Success Ultra Insect Control concentrate is an easy way to control caterpillars on kale. Spray kale every 1 – 2 weeks, ensuring leaves are sprayed to the point of run off.


Share
Share this article on social media