Yates Account
Join now
Create a Yates account today!
Sign up to join the Yates Garden Club for monthly e-mails packed with seasonal inspiration, tips for success & exclusive promotions.
Plus if you’re a Garden Club member you can take part in the Yates Growing Community - a blog to share successes, get advice & win prizes in fun challenges along the way!

Forgot password
Enter the email address associated with your account, and we'll email you a new password.

Oranges are one of life’s great pleasures. But a fresh, home-grown orange elevates the taste to a place the humble supermarket orange just can’t reach.
There are many varieties to choose from, including Valencia, Seville or Washington Navel - and many dwarf forms too which are ideal for small gardens or pots.
How to grow Oranges in a garden
- Choose a sunny spot with well drained soil. Enrich the soil with Yates Dynamic Lifter Organic Plant Food. If the soil is clay based, improve soil structure by adding gypsum and forking in well. In poorly drained areas, citrus can also be planted in a raised mound of free-draining soil.
- Dig the planting hole twice as wide and to the same depth as the root-ball. Remove the plant from the container, gently tease the roots and cut away any circled or tangled roots.
- Position in hole and backfill with soil, gently firming down. Form a raised doughnut shaped ring of soil around the outer edge of the plant's root zone. This helps keep water where it's needed. Always water in well after planting to settle the soil around the roots and keep the soil moist for several weeks while the new plant establishes.
- Mulch around the base with organic mulch like woodchip or pea straw, keeping it away from the trunk.
- Water deeply, once or twice a week, depending on weather conditions.
- During the growing and flowering/fruiting season, feed with Yates Thrive Citrus & Fruit Granular Plant Food. Throughout the year, apply Yates Thrive Natural Fish & Seaweed+ Plant Food.
How to grow Oranges in a pot
When planting in a pot, choose a dwarf orange variety, such as Dwarf Valencia or Dwarf Navel.
-
- Choose a pot at least 500mm wide. Position in full sun and fill with quality potting mix, such as Yates Premium Potting Mix. TIP: Consider placing the pot on wheels if you live in a cold area, so it can be easily moved inside or to a sunnier and more protected spot in winter.
- Remove the plant from the container, gently tease the roots and cut away any circled or tangled roots.
- Position in hole and backfill with potting mix, gently firming down. Water in well.
- Water deeply, 2-3 times during the week, depending on weather conditions.
- During the growing and flowering/fruiting season, feed weekly with Yates Thrive Citrus Liquid Plant Food. Throughout the year apply Yates Thrive Natural Fish Seaweed+ Plant Food.

Seville Oranges
If you love the idea of spreading tangy homemade marmalade on hot buttered toast, Seville oranges are the ones for you.
Sometimes called a bitter or sour orange, Seville oranges (Citrus x aurantium) produce aromatic, intensely flavoured sour fruit with a thick rind. They make superb marmalade, as well as delicious zest and juice for bringing a citrus flavoured kick to a meal.
Seville oranges are hardy trees, that will grow in all but the coldest areas. Reaching 2-4m in height, they prefer a warm sunny location with well-drained soil. They’re fast growing attractive trees with deep green leaves, fragrant white flowers in spring and decorative vibrant fruit that ripens in winter.
When planting a new Seville orange tree into the ground, mix some Yates Dynamic Lifter Organic Plant Food into the bottom of the planting hole. Yates Dynamic Lifter improves the quality of the soil and supplies the newly planted orange with gentle organic nutrients as it establishes.
Oranges, like other citrus, are heavy feeders and require a lot of nutrients to support all the foliage, flowers and developing fruit. Feed orange trees from spring right up until the end of harvest, every 1 – 2 weeks with Yates Thrive Citrus Liquid Plant Food. It's a complete plant food that contains a special blend of nutrients, rich in flower and fruit-promoting potassium. It will also encourage healthy green leaf growth.
Keep Seville orange trees well-watered and apply a layer of mulch around the root zone, to help retain soil moisture. Keep mulch 5-10cm away from the trunk itself, to promote good air flow and reduce the chance of disease.
Navel Gazing!
Navel oranges are named for their strange little 'belly-button' on the base of the fruit. There are a few varieties of navel oranges, including 'Washington', 'Lane’s Late', 'Cara Cara' and 'Navelina'. Different varieties ripen during different months, but predominantly they'll ripen in winter and spring.
Brightly coloured 'Washington' navel oranges look like they're dripping from trees during winter. They’re sweet, juicy, easy to peel, seedless and make a fantastic citrus to grow at home.
Dwarf varieties of navels grow to around 1.5m tall, so they’re easy to maintain (and you don’t need a ladder to harvest!), plus they're perfect for growing in a container.
Here’s how to get the best out of navel oranges:
-
Find a sunny spot that receives at least 6 hours of sunshine a day, with well-drained soil.
-
Navel oranges prefer growing in a temperate or sub-tropical climate, though they'll cope with cooler locations.
-
If you’re growing a navel orange in a container, choose a dwarf variety, use a pot that’s at least 40cm in diameter and fill with good quality potting mix like Yates Premium Potting Mix.
-
Feeding citrus regularly is the key to promoting the best possible harvest. Citrus are very hungry plants! Yates Thrive Natural Citrus Fruit Plant Food is a complete fertiliser, specially formulated to provide citrus with the nutrients they need.
-
Apply Yates Thrive Citrus Liquid Plant Food every week while oranges are still on the tree and then start feeding again in early spring when new foliage and flower buds start to emerge.
-
When planting a new navel orange tree into the ground, mix some Yates Thrive Natural Blood & Bone into the bottom of the planting hole. Yates Thrive Natural Blood & Bone improves the quality of the soil and supplies the newly planted orange with gentle, organic nutrients as it establishes.
Reviving an Old Citrus Tree
Most citrus trees, particularly compact varieties, don’t require much pruning. Sometimes though, a large, older tree can start to become congested with dead branches and stems. This leads to poor plant health and a reduced harvest. If this sounds like a tree at your place, it might be time to take a deep breath...and do some serious pruning.
‘Skeletonising’ trees is a process where much of the canopy and main branches are removed. It ends up looking quite brutal; but it can encourage a fresh flush of new, healthy growth and rejuvenate a tree (that might otherwise remain unhealthy and unproductive). It can take about 2 years for the tree to recover and start producing fruit again, so it’s a process that requires some consideration and patience.
Skeletonising is best done in late winter or early spring. In cold areas, wait until the chance of frost has passed.
Here’s the citrus revival process:
-
Using sharp tools (loppers, secateurs or a pruning saw) cut off any dead branches near the main trunk.
-
Check for any stems (suckers) growing up from below the bumpy graft union at the base of the trunk (they tend to have nasty spines, so be careful). Cut these off, as they'll take over and hold back the tree from producing fruit.
-
Cut all remaining healthy branches back to where they're around 3cm in diameter. Warning: the tree will look awful (hence the term skeletonising). When you’re pruning off an entire branch, make the cut just outside the branch ‘collar’, the elbow where the branch joins the main trunk. Easily identifiable by the ridged or wrinkled texture of the bark, the branch collar is where the healing magic can happen, thanks to the meristematic tissue located there. The place to cut is at the outside of the branch collar, not right up flush against the trunk (cutting flush removes the natural healing tissue and makes the wound bigger than it needs to be). Over time, the natural healing mechanisms of the tree assert themselves and a doughnut of protective bark callus forms around the cut, eventually closing up completely.
-
When pruning citrus, it's good to be aware that Lemon Tree Borer beetles are about from mid-spring to autumn, on the lookout for trees to lay their eggs. The scent of freshly pruned citrus trees attracts them like a magnet, so it’s wise to restrict pruning to between April and August, or protect the cuts with Yates PruneTec, which seals off the wound and forms a physical barrier against larvae boring into the tree. Whenever you're pruning, make sure to tidy up and burn the offcuts.
-
Now it's time for some TLC. Apply some Yates Dynamic Lifter Organic Plant Food around the root zone. It contains a rich source of organic matter to promote improved soil health and structure. Thoroughly and deeply water (and re-water every week until autumn). After a fortnight, start feeding with Yates Thrive Citrus Liquid Plant Food every week until autumn. This will encourage fresh new growth, help grow back a lush, healthy canopy and give your poor old tree a new lease on life.
Give a Mango a Go
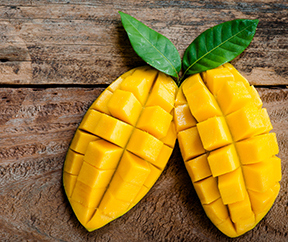
Mangoes are a divine, sweet and juicy tropical fruit that will tolerate frost-free zones in the warmest spots in New Zealand.
Mango trees are self-fertile, so they don’t need help from another tree to produce fruit. However, mango addicts could consider growing several different varieties to extend the harvest season over several months.
Mangoes do best in moist but well-drained soil. They can be planted during spring, after any chance of frost has passed, in subtropical areas.
When planting a new mango tree, enrich the soil in the planting hole with some Yates Dynamic Lifter Organic Plant Food and keep the new tree well-watered while it establishes.


Share
Share this article on social media