


Onion
They may make you cry, but onions are worth the tears! They can impart such a sweet or savoury flavour to your dishes, depending on how they’re used.
Create a Yates account today!
Sign up to join the Yates Garden Club for monthly e-mails packed with seasonal inspiration, tips for success & exclusive promotions.
Plus if you’re a Garden Club member you can take part in the Yates Growing Community - a blog to share successes, get advice & win prizes in fun challenges along the way!
Enter the email address associated with your account, and we'll email you a new password.
There are two main kinds of garlic: hard neck or soft neck. Hard neck varieties are better suited to cool or cold winter areas, while soft neck grows best in warm climates.
It’s easy to spot the difference between the two types: hardneck garlic has a stout stem (as the name suggests) plus it sprouts scapes. A scape is a central stalk that grows in loopy spirals, then pops out a flower at the top. The flower develops into a head of bulbils, that look like tiny garlic cloves. Bulbils can be planted or eaten. However, most gardeners pull out the scapes before they form flowers, to maximise the energy the plant is putting into forming plump garlic heads. As a bonus, you can add the removed scapes to a meal, just like spring onions.
Softneck garlic on the other hand, doesn’t form scapes. The supple stems are much more suited to making garlic braids after harvest. Most commercially grown garlic will be a soft neck type, as it tends to grow faster.

These two main types of garlic are further classified into different groups, all with distinctively different tastes and colours.
The Artichoke and Silverskin groups are the most common soft neck types. They’re a great choice for the warmer areas of the country, and store well. The ubiquitous ‘Printanor’ variety is a silverskin type, that originated in France.
The hard neck group most suitable for the warm or temperate areas of the country are Creole, Turban and Asiatic. These varieties tend to be more flavoursome and hotter tasting than soft neck types. The popular ‘Aja Rojo’ variety is a creole type.
Hard necks most suited to the cold winter areas of NZ are Porcelain, Rocambole and several variants of Purple Stripe. These types mature more slowly than the others and are quite strongly flavoured. Rocambole in particular is renowned for its taste; but isn’t a great keeper.
All these different types are available in NZ, but you may need to do some extra searching to order them from a specialist supplier (they aren’t widely available in garden centres).
Elephant garlic (Allium ampeloprasum var. ampeloprasum) is a different proposition. It's readily available, but technically it isn't garlic! It's actually a member of the leek family, popular for its very large, mild-tasting cloves and for its ability to grow in a wide range of climates.

Choose a spot in the garden with plenty of sun and well-drained soil. Garlic needs at least six hours of sunshine a day. Practise crop rotation, using a new planting spot every year. Wait for 3 years before planting in the same spot.
Improving the soil before planting will help give your garlic a great start. Soil improvement can be as simple as mixing two handfuls of Yates Dynamic Lifter Organic Plant Food into each square metre of soil, but every little bit of organic matter you can dig in will help.
Garlic does best in slightly acidic soil (pH 5.5-7). In alkaline soils (pH greater than 7), the soil pH can be reduced by applying Yates Soil Acidifier Liquid Sulfur.
Separate the garlic bulb into individual cloves. Choose the biggest cloves from around the outside of the bulb. Make holes in the soil 2cm-5cm deep, and 10cm-20cm apart, then push in the cloves. Ensure the clove is planted pointy end up! Water them in well and mulch lightly with an organic mulch, like pea straw. Mulch helps to keep the soil moist.

As soon as leaves emerge, feed the garlic plants every 1-2 weeks with Yates Thrive Vegie & Herb Liquid Plant Food. Garlic is a heavy feeder, so regular feeding promotes healthy leaf growth and plump bulbs.
Water regularly throughout the growing season to keep the soil moist, but not wet. Garlic bulbs can rot during prolonged wet weather or in poorly drained or heavy clay soil, so grow garlic in a well-drained position and monitor soil moisture levels. To help reduce the incidence of leaf diseases, water around the base of the plants and avoid watering the leaves.

Garlic can be harvested around eight months after planting. Get ready to harvest when several of the lower leaves start to yellow or brown. Timing is perfect while there are still 5-6 green leaves remaining at the top of the plant. Using a small trowel, gently lift from underneath the bulb while pulling up on the stem. Be careful with the bulbs, as they bruise easily (bruising means they won't store well).
You can clean the dirt off by pulling the lowest green leaf all the way down, so the lower leaf skin peels off the garlic bulb like a banana.
Hang the harvested plants, with the stems, leaves and roots still attached, in a dry, airy sheltered spot for about a month, to cure. When the top green leaves have turned brown and papery, you can trim the neck of the garlic down to around 15-20cm from the bulb. Also trim the long roots to tidy them up. If there are no signs of green left inside where you've trimmed the neck, your garlic is cured and ready to use!

A very traditional method to store garlic is to braid it. This is easy and fun to do. It's best to braid your garlic after a couple of weeks of curing time, so the stems are still soft enough to plait neatly.
To keep garlic for a long period, it needs to be stored inside, in a dry, airy place, out of direct sun. Store garlic in mesh bags or brown paper bags to get maximum longevity. Avoid airtight containers, as garlic quickly goes mouldy and rots when sealed in.
You can freeze garlic for long-term storage, by separating the cloves and popping them into a sandwich bag.

Choose a pot at least 30-40cm wide and 20cm deep; bigger is better. Position the pot in a sunny spot that receives at least six hours of sunshine a day.
Fill the pot with quality potting mix, such as Yates Premium Potting Mix. Don’t reuse potting mix that has had garlic, onions or shallots growing in it previously.
Separate the garlic bulb into individual cloves. Choose the biggest cloves from around the outside of the bulb. Make holes in the potting mix 2cm-5cm deep, and 10cm-20cm apart, then push in the cloves. Ensure the clove is planted pointy end up!
Water in well and mulch lightly over the surface of the potting mix with an organic mulch, like pea straw. Mulch really helps to keep the potting mix moist.
For early care in pots, plus harvesting and storing advice, refer to Step 4, Step 5 and Step 6 above.

There are two main types of garlic to choose from: hard and soft neck. Hard neck varieties are better suited to temperate and cold winter areas, while soft neck varieties grow best in temperate and subtropical zones.
You can start planting garlic in NZ in autumn. It was traditional to wait until the shortest day (the Winter Solstice) in June, but in warmer areas it pays to get started earlier. This minimises the risk of rust at the end of the season. However, for hard neck garlic planted in cold winter zones, it’s still best to wait until June.
Garlic can be harvested around eight months after planting. Get ready to harvest when several of the lower leaves start to yellow or brown. The timing is perfect while there are still 5-6 green leaves remaining at the top of the plant.
Plant individual garlic cloves 2-5 cm deep and 10-20 cm apart. Ensure the clove is planted pointy end up!
To promote healthy leaf growth and plump garlic bulbs, as soon as leaves emerge, feed the garlic plants every 1-2 weeks with Yates Thrive Vegie & Herb Liquid Plant Food. This contains the right balance of key nutrients to feed garlic.

There are several reasons why garlic plants don’t form cloves; you may run into issues with planting, harvesting, nutrients, or garlic seed choice and quality.
This indicates you’ve waited too long to harvest, so the outer skin has dried out. Garlic needs to retain a few moist layers of skin to begin the curing process, to make sure it stores well. This is why it’s best to harvest while the plant still has 5-6 green leaves at the top.
Garlic leaves falling over, drooping or wilting can be caused by various things including lack of light, watering issues, pests or diseases.
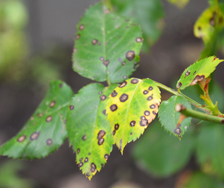
Appears as small powdery orange-brown spots on the leaves. Most common on mature leaves, becomes worse as the weather warms up at the end of garlic season. Can be reduced by keeping leaves as dry as possible and only watering at the base of plants.
Solution
Causes yellowing leaves, dead outer leaves, and rotten stems and bulbs. To reduce risk, plant garlic in well-drained soil (or grow in pots), only plant clean disease-free cloves and avoid planting garlic (or onions) in the same area for the next 3 years.
Solution
There is no control for white rot. Once soil has become infected, the disease can remain active for decades.
New leaves are distorted and yellow, foliage and stems are often covered in black sooty mould, insects can be seen crowded on young leaves and shoots. The most common aphids to attack garlic are 'black aphids' (dark grey or black coloured). These often congregate on the bases of the leaves.
Solution
Discoloured and deformed foliage. Leaves develop silvery or mottled patches. You may also notice small dark droppings.
Solution


Share
Share this article on social media